
Crochet Frog Pattern
This crochet frog pattern/amigurumi pattern is made with a single crochet stitch, and because of this the frog is really easy to make and a great pattern for beginners.
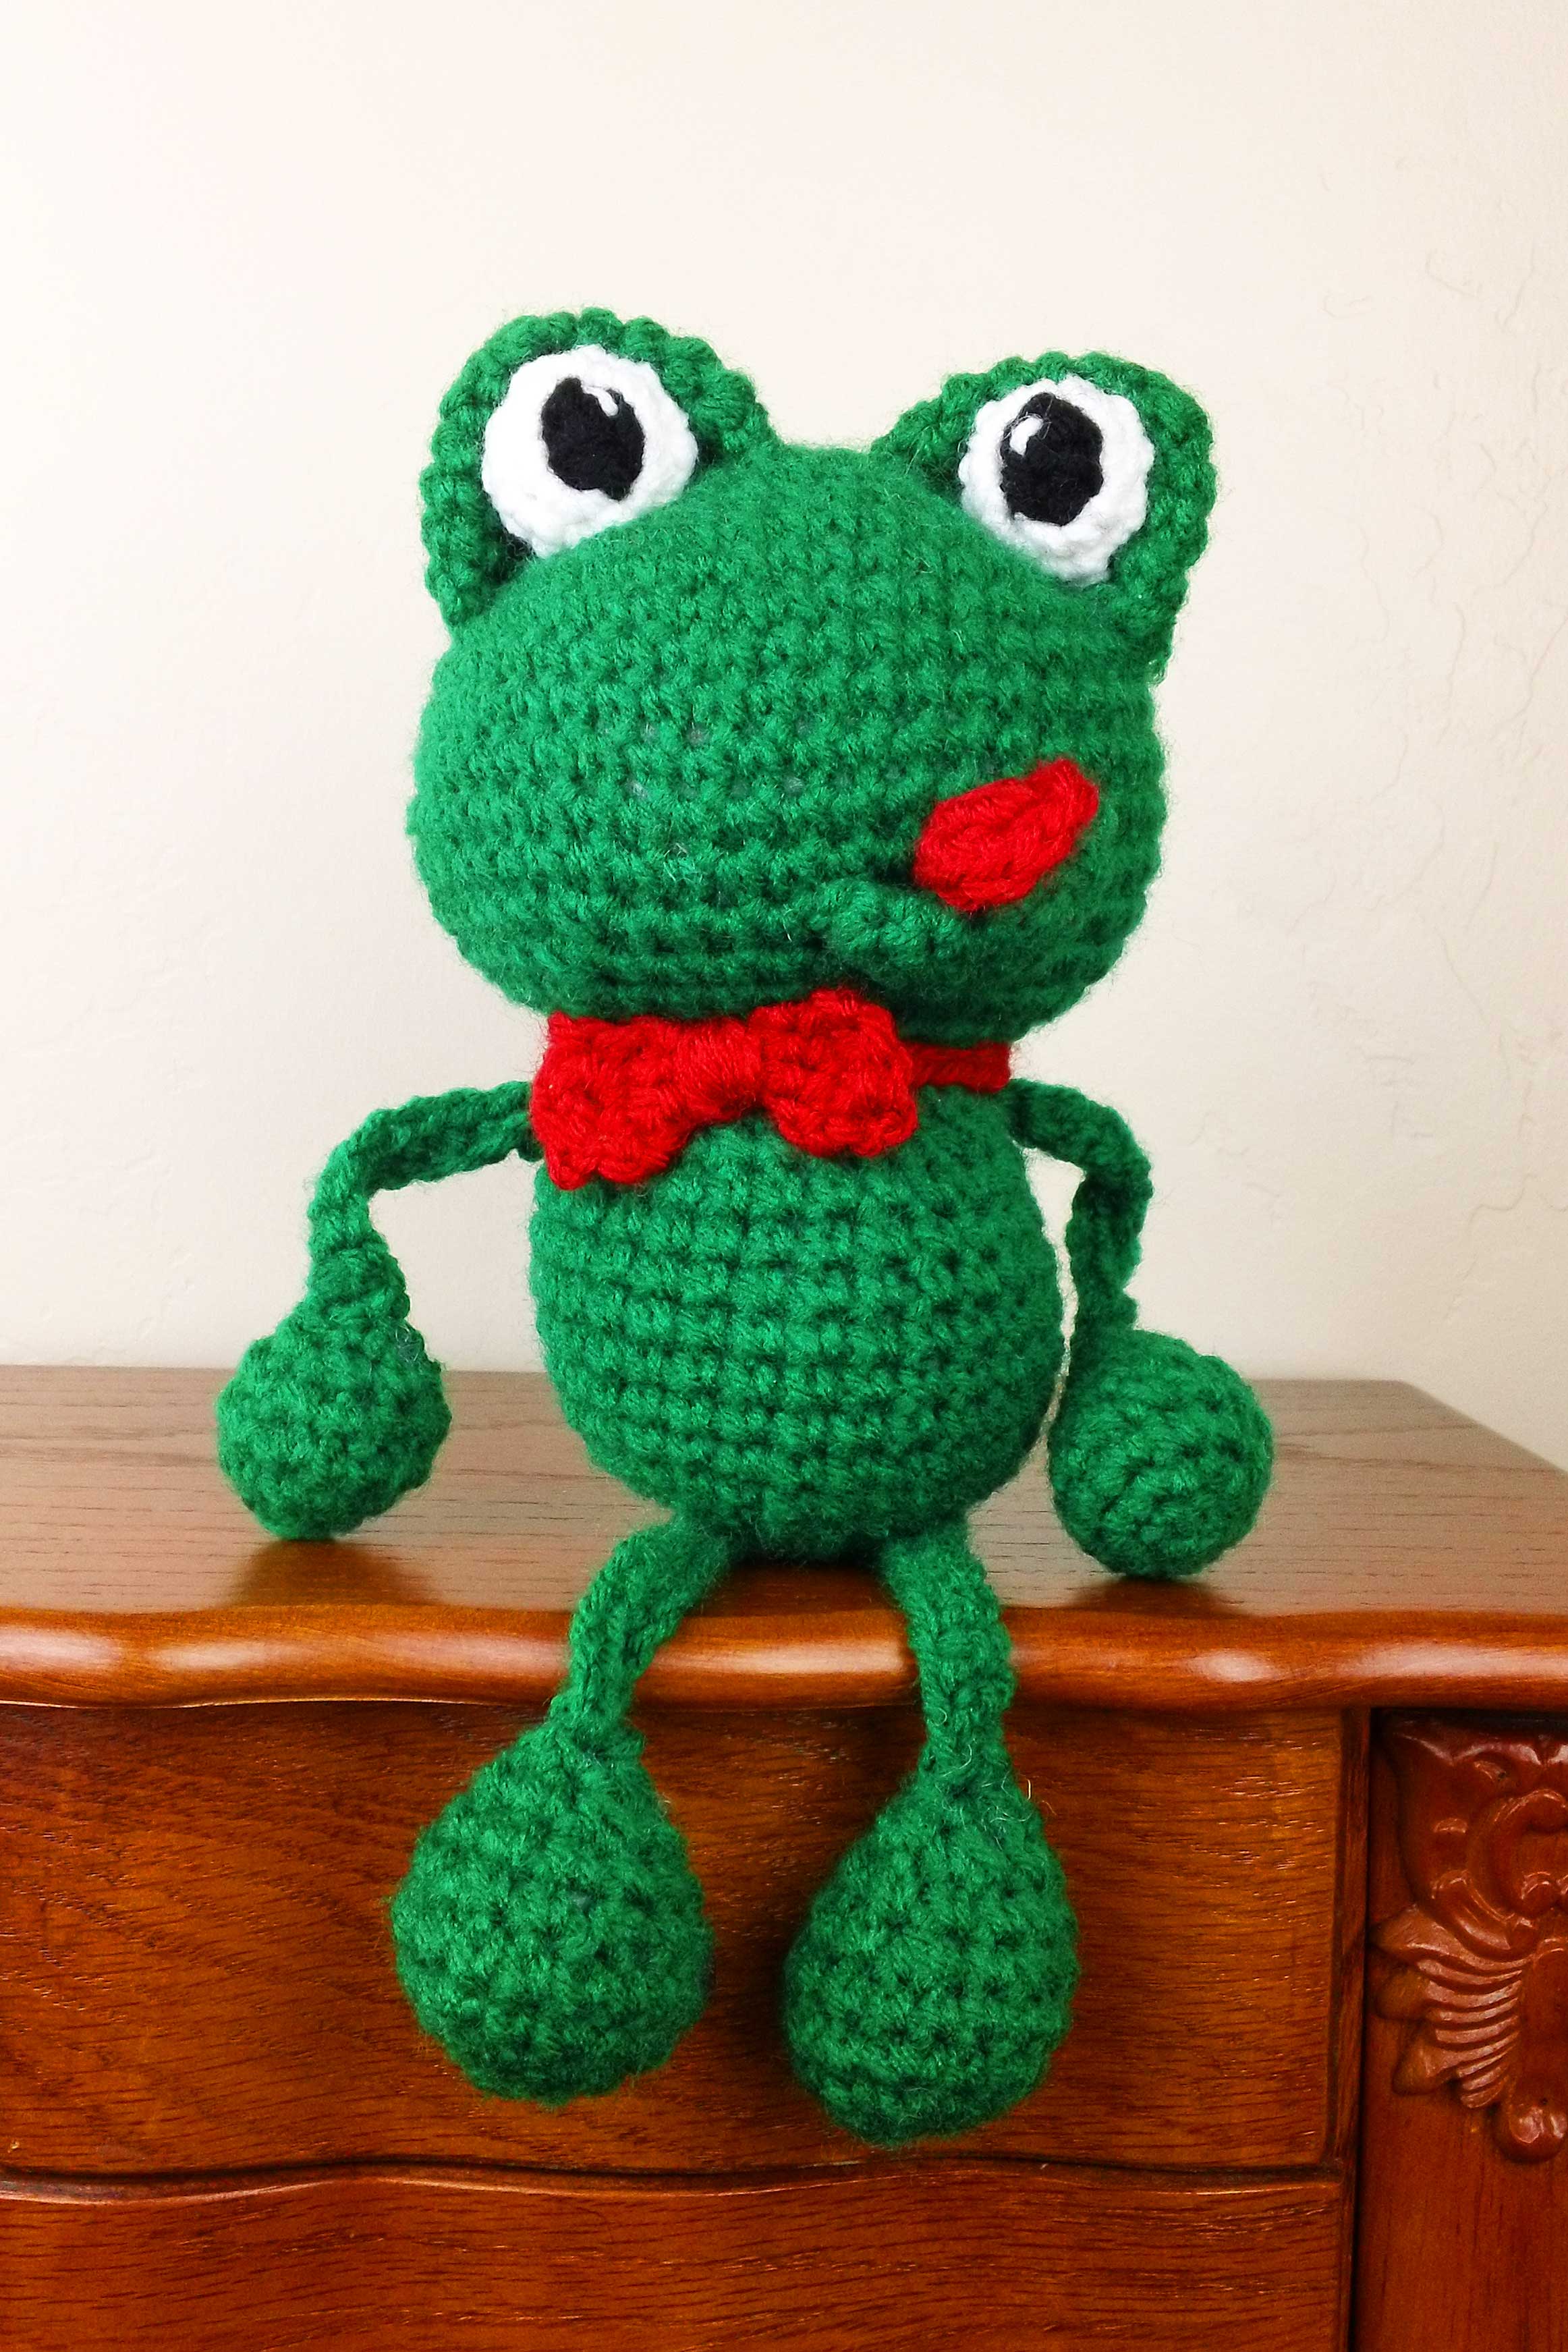
My goal was to make this crochet frog unique by giving him a personality all of his own, and because of this I decided to give him an extended lower lip with a little red tongue sticking out. I feel that this feature really adds to his charm and gives him a lot of character.
I had so much fun creating this frog pattern, and I am really excited to share this little guy with you. I call this amigurumi frog pattern "Frankie the Frog" and I hope you enjoy him as much as I do.
Frankie the Frog

Crochet Frog Pattern Details
Materials Needed:
1. Yarn: Worsted Weight
*I usually try to find the best deals when it comes to buying yarn, hooks, etc., and it looks like the best place to shop right now is amazon.com especially if you have a prime membership... free shipping is always a bonus. Some of the yarn listed below has prime shipping and some do not, but the ones I listed have the best prices.
*P.S. These are affiliate links and I try to shop around for the best prices... if you find better prices for yarn, hooks, etc. let us know in the comment box below!
2. Crochet Hook –H/8
3. Yarn Needle (blunt sewing needle with big eye)
*If you don't have a prime membership with amazon the polyfil fiber is less expensive at joann.com.
Stitch Abbreviations:
sc – single crochet
sl st – slip stitch
ch – chain
Sc2tog – decrease
Finished Size:
7 1/2 inches long (standing)
3 inches wide
Stitch Explanation:
Sc2tog: single crochet the next 2 stitches together.
Crochet Frog Pattern Instructions
Head
With color A (green)
Ch 3
Rnd 1: Join into the last ch from the hook to form a ring, 2 sc in each ch around. (6 sc)
Rnd 2: 2 sc in each sc around. (12 sc)
Rnd 3: (sc in next sc, 2 sc in next sc) repeat 6 times. (18 sc)
Rnd 4: (sc in next 2 sc, 2 sc in next sc) repeat 6 times. (24 sc)
Rnd 5: (sc in next 3 sc, 2 sc in next sc) repeat 6 times. (30 sc)
Rnd 6: (sc in next 4 sc, 2 sc in next sc) repeat 6 times. (36 sc)
Rnd 7: (sc in next 5 sc, 2 sc in next sc) repeat 6 times. (42 sc)
Rnd 8: (sc in next 6 sc, 2 sc in next sc) repeat 6 times. (48 sc)
Rnds 9-14: sc in each sc around. (48 sc in each rnd 9-14)
Rnd 15: (sc in next 6 sc, sc2tog) repeat 6 times. (42 sc)
Rnd 16: (sc in next 5 sc, sc2tog) repeat 6 times. (36 sc)
Rnd 17: (sc in next 4 sc, sc2tog) repeat 6 times. (30 sc)
Rnd 18: (sc in next 3 sc, sc2tog) repeat 6 times. (24 sc)
Rnd 19: (sc in next 2 sc, sc2tog) repeat 6 times. (18 sc)
Stuff the head firmly.
Rnd 20: (sc in next sc, sc2tog) repeat 6 times. (12 sc)
Rnd 21: (sc2tog) repeat 6 times. (6 sc)
Fasten off and weave in loose strand.
Body
With color A (green)
Ch 3
Rnd 1: Join into the last ch from the hook to form a ring, 2 sc in each ch around. (6 sc)
Rnd 2: 2 sc in each sc around. (12 sc)
Rnd 3: (sc in next sc, 2 sc in next sc) repeat 6 times. (18 sc)
Rnd 4: (sc in next 2 sc, 2 sc in next sc) repeat 6 times. (24 sc)
Rnd 5: (sc in next 3 sc, 2 sc in next sc) repeat 6 times. (30 sc)
Rnd 6-13: sc in each sc around. (30 sc in each rnd 6-13)
Rnd 14: (sc in next 3 sc, sc2tog) repeat 6 times. (24 sc)
Rnd 15: (sc in next 2 sc, sc2tog) repeat 6 times. (18 sc)
Start stuffing body firmly with polyfil fiber, and continue to stuff throughout the rest of rnds 16-17.
Rnd 16: (sc in next sc, sc2tog) repeat 6 times (12 sc)
Rnd 17: (sc2tog) repeat 6 times (6 sc)
Sl st into the next sc and fasten off leaving a 15-20 inch tail for assembly.
Legs (make 2)
With color A (green)
Ch 3
Rnd 1: Join into the last ch from the hook to form a ring, 2 sc in each ch around. (6 sc)
Rnd 2: 2 sc in each sc around. (12 sc)
Rnd 3: (sc in next sc, 2 sc in next sc) repeat 6 times. (18 sc)
Rnd 4: sc in each sc around. (18 sc)
Rnd 5: (sc in next sc, sc2tog) repeat 6 times. (12 sc)
Rnd 6: sc in each sc around. (12 sc)
Rnd 7: (sc in next sc, sc2tog) repeat 4 times. (8 sc)
Stuff with polyfil lightly
Rnd 8: (sc2tog) repeat 4 times. (4 sc)
Do not fasten off, ch 12.
Row 1: sc into the 2nd ch from the hook and continue to sc in each sc across. ( 11 sc)
Sl st into the top of the frogs foot and fasten off.
Weave in loose strands.
Picture: This is what the head, body, legs, and eye lids looks like when assembled. This frog pattern calls for you to attach the frog's body by using yarn and a yarn needle.
Crochet Frog Pattern Continued
Arms (make 2)
With color A (green)
Ch 3
Rnd 1: Join into the last ch from the hook to form a ring, 2 sc in each ch around. (6 sc)
Rnd 2: 2 sc in each sc around. (12 sc)
Rnd 3: (sc in next sc, 2 sc in next sc) repeat 6 times. (18 sc)
Rnd 4: (sc in next sc, sc2tog) repeat 6 times (12 sc)
Rnd 5: (sc in next sc, sc2tog) repeat 4 times (8 sc)
Rnd 6: sc in each sc around. (8 sc)
Stuff with polyfil fiber lighty
Rnd 7: (sc2tog) repeat 4 times. (4 sc)
Do not fasten off, ch 10.
Row 1: sc into the 2nd ch from the hook and continue to sc in each sc across. ( 9 sc)
Sl st into the top of the frogs foot and fasten off.
Weave in loose strands.
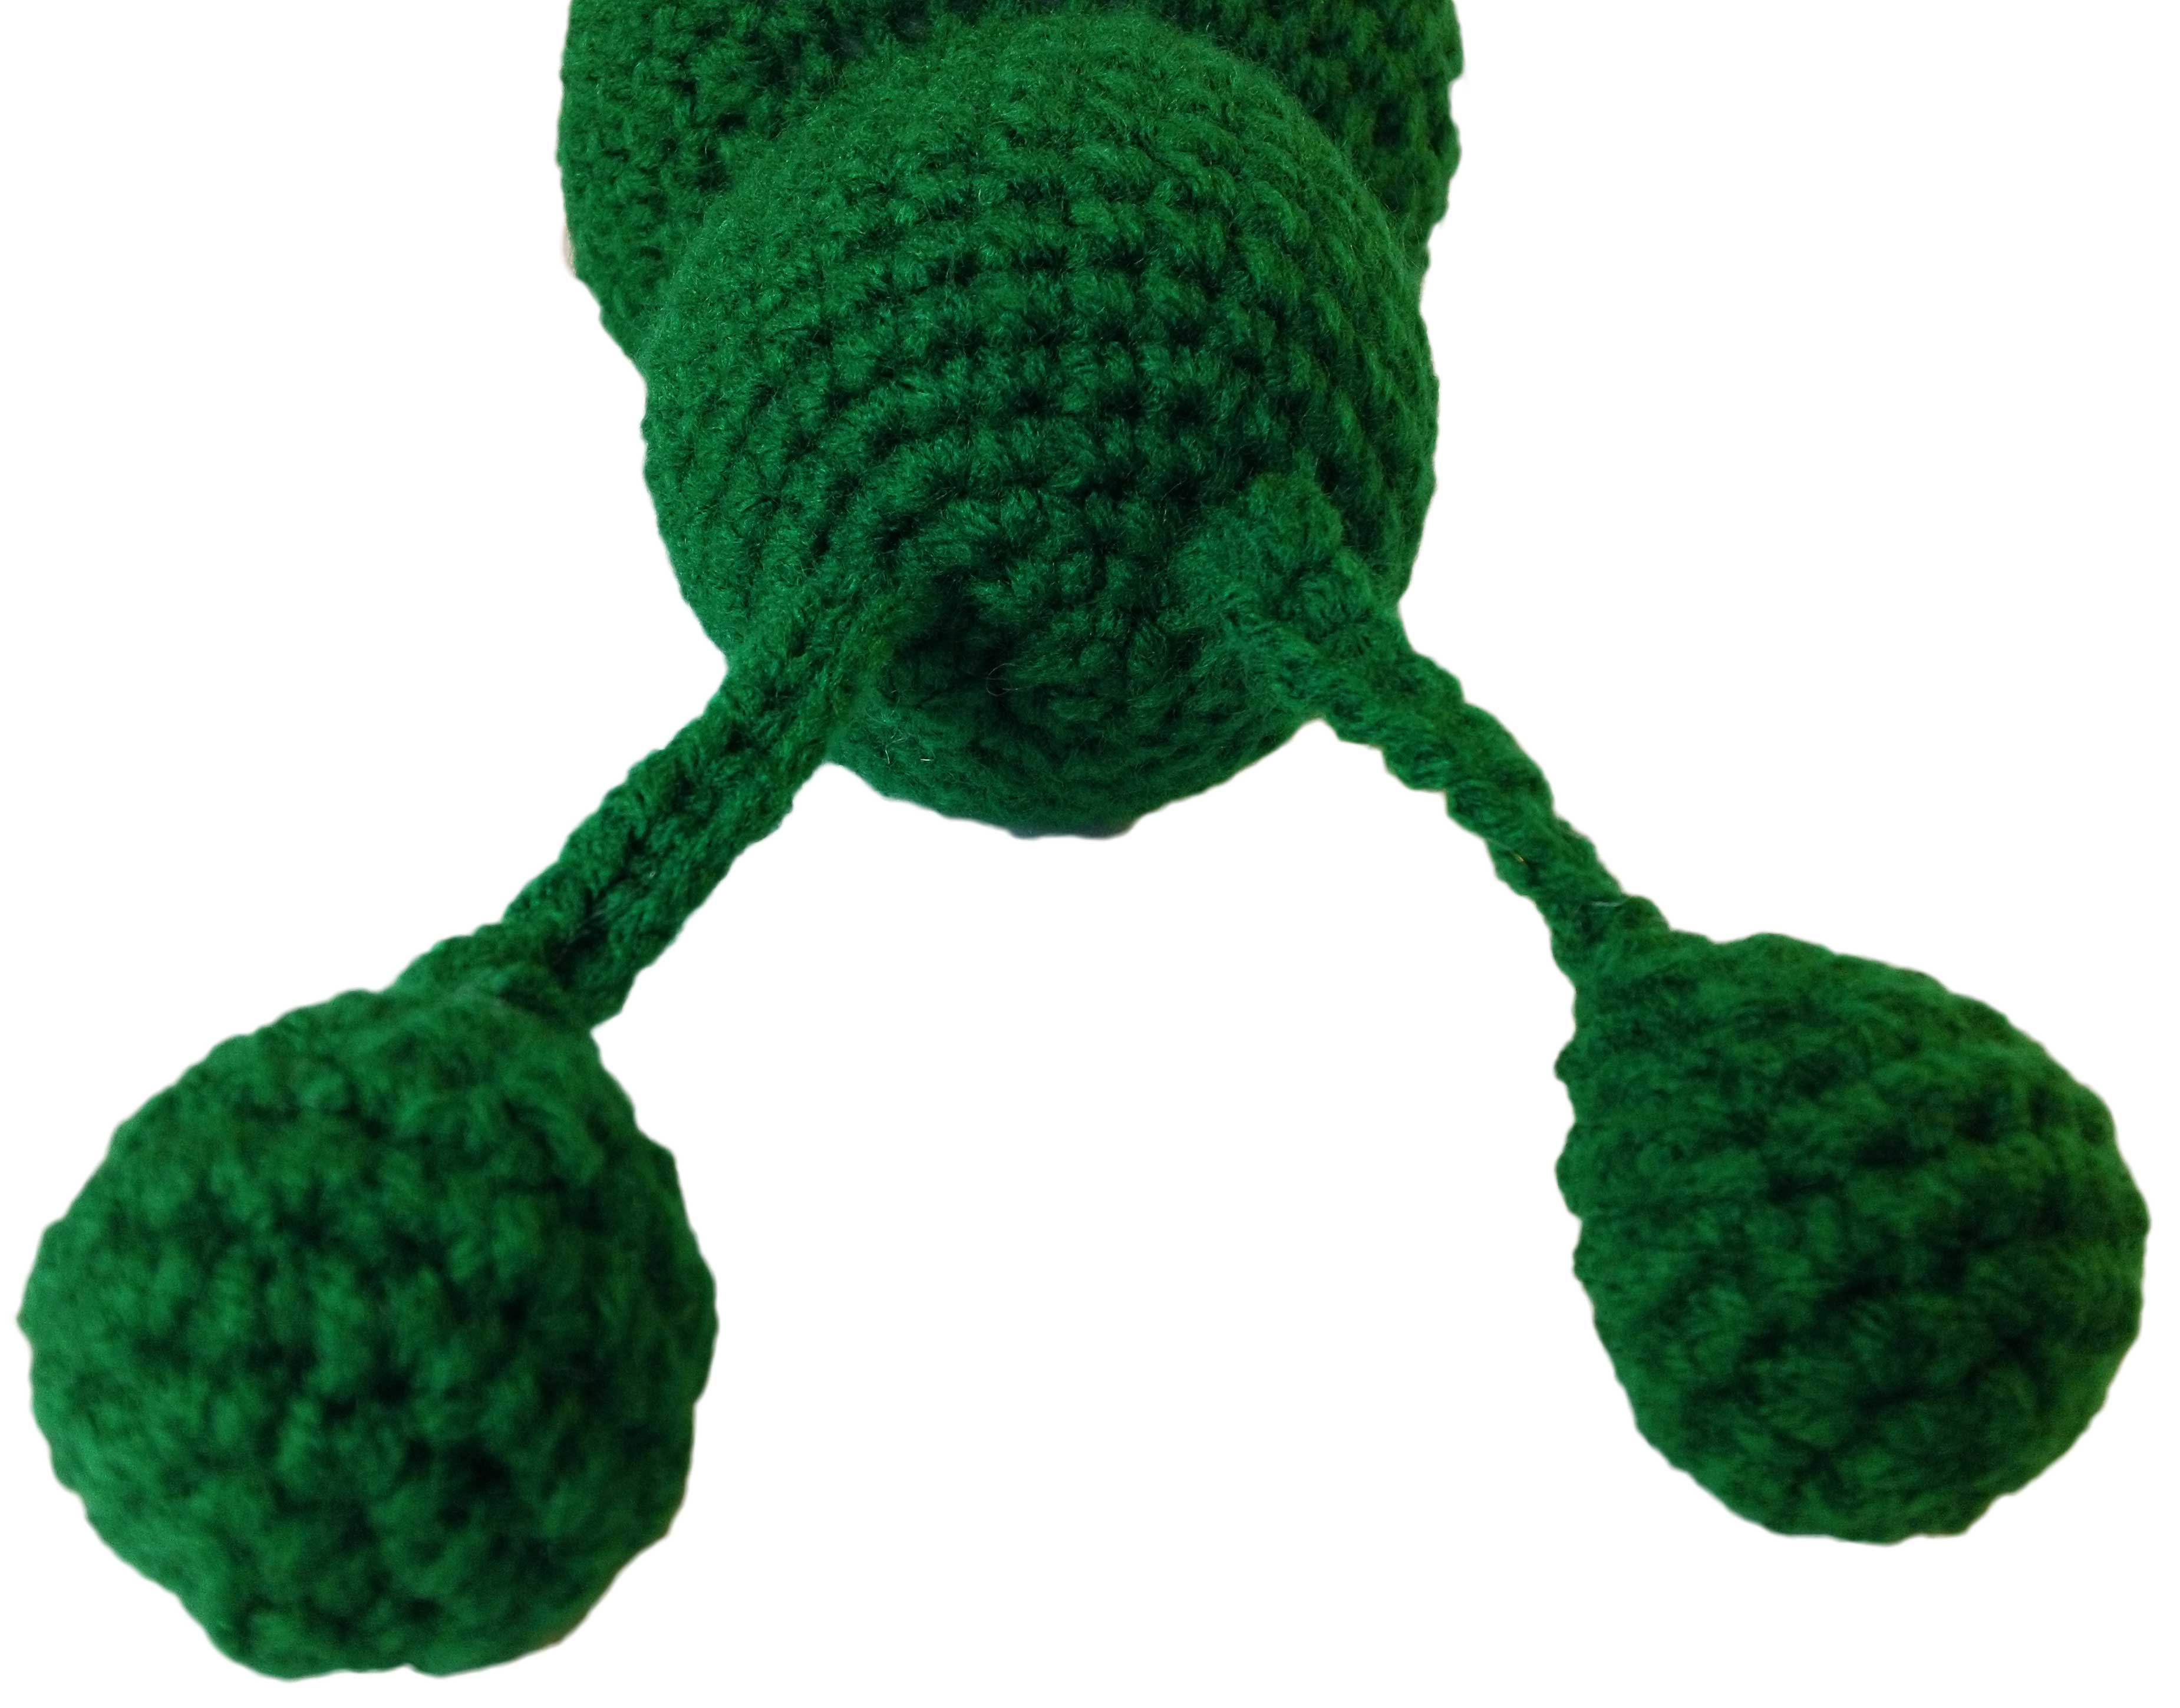
Eye Lids (make 2)
With color A (green)
Ch 3
Rnd 1: Join into the last ch from the hook to form a ring, 2 sc in each ch around. (6 sc)
Rnd 2: 2 sc in each sc around. (12 sc)
Rnd 3: (sc in next sc, 2 sc in next sc) repeat 6 times. (18 sc)
Rnd 4: (sc in next 2 sc, 2 sc in next sc) repeat 6 times. (24 sc)
Rnd 5: (sc in next 3 sc, 2 sc in next sc) repeat 6 times. (30 sc)
Rnd 6: (sc in next 4 sc, 2 sc in next sc) repeat 6 times. (36 sc)
Fasten off leaving a 15 in tail for assembly.
Fold circle in half and stitch open ends together.
Picture: This is how the eye lids should look when you assemble the frog.
Crochet Frog Pattern Continued
Eyes (make 2)
With color B (white)
Ch 3
Rnd 1: Join into the last ch from the hook to form a ring, 2 sc in each ch around. (6 sc)
Rnd 2: 2 sc in each sc around. (12 sc)
Rnd 3: (sc in next sc, sc2tog) repeat 4 times. (8 sc)
Stuff lightly
Rnd 4: (sc2tog) repeat 4 times. (4 sc)
Fasten off leaving a 10 in tail for assembly.
Pupils (make 2)
With color C (black)
Ch 3
Rnd 1: Join into the last ch from the hook to form a ring, 2 sc in each ch around. (6 sc)
Fasten off leaving a 12 in tail for assembly.

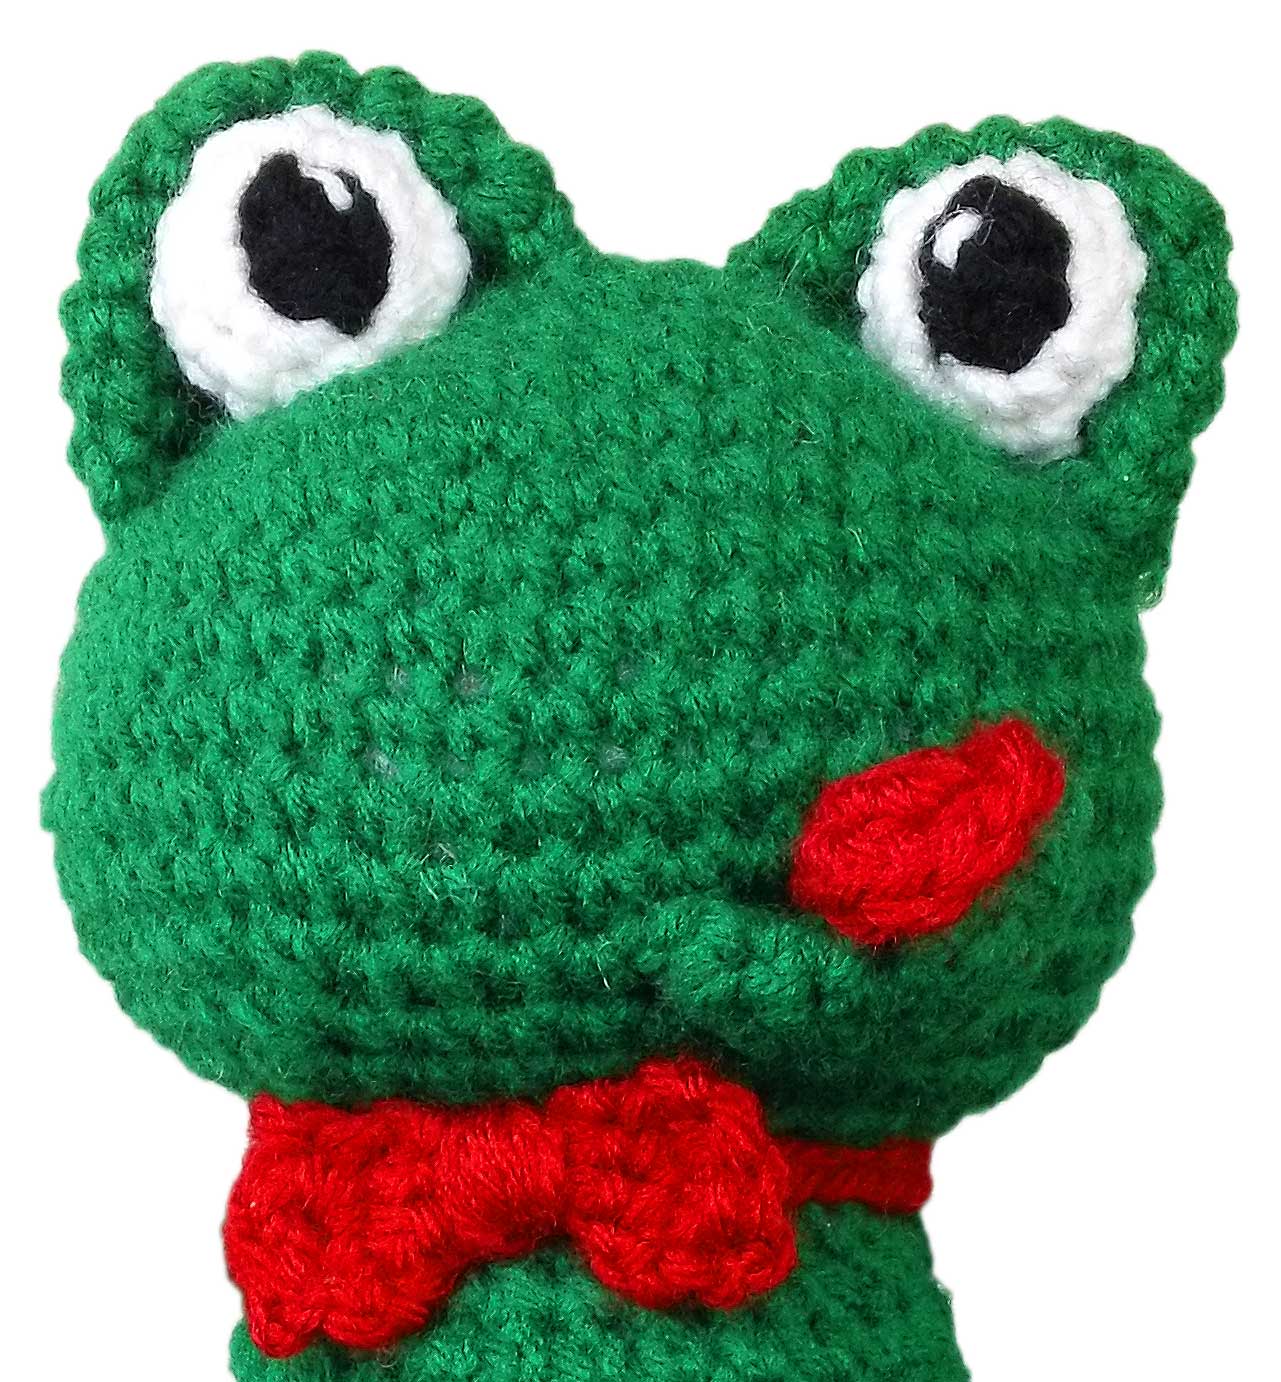
Picture: This crochet frog pattern calls for you to attach the pupils to the eyes before assembling them to the frog's eye lids. It is also best to stitch a white line in each eye for added character.
Lower Lip
Ch 3
Rnd 1: Join into the last ch from the hook to form a ring, 2 sc in each ch around. (6 sc)
Rnd 2: 2 sc in each sc around. (12 sc)
Rnd 3: (sc in next sc, 2 sc in next sc) repeat 6 times. (18 sc)
Fasten off leaving a 15 in tail for assembly.
Fold circle in half and stitch open ends together.
Tongue
Ch 3
Rnd 1: Join into the last ch from the hook to form a ring, 2 sc in each ch around. (6 sc)
Rnd 2: 2 sc in each sc around. (12 sc)
Fasten off leaving a 15 in tail for assembly.
Fold circle in half on one end and stitch end together to make a tongue.
Picture: This crochet frog pattern calls for you to bend the lower lip slightly before placing it on the frog's face. After the lower lip is secure place the red tongue on top of the frog's lower lip.
Crochet Frog Pattern Continued
|
Bow Tie: With color D (red) Ch 4 Row 1: sc into 2nd ch from the hook and sc in each sc across. (3 sc) Bow Tie: With color D (red) Ch 4 |
Row 1: sc into 2nd ch from the hook and sc in each sc across. (3 sc)
Rows 2-8: ch 1, sc in each sc across. (3 sc in each row 2-8)
Fasten off
Wrap the color D (red) around the bow tie about 10 times tightly, and secure into place.
Neck Band
With color D (red)
Ch 25
Fasten off
Crochet Frog Pattern Assembly:
Note: Use the yarn needle to stitch and attach parts of the body together.
1. Attach by stitching the body to the head by using the 15-20 in tail.
2. Attach legs by stitching them into the bottom of the frog’s body.
Picture: In this crochet frog pattern notice how the legs are attached underneath the frog's body.
3. Attach arms by stitching them into both sides of the frog’s body underneath the head.

4. Bend eye lids slightly and stitch on top of the frog’s head.
5. Attach pupil to eye by stitching them together.
6. Place eye into eyelid and stitch into place.
7. Use a strand of white yarn and stitch a small line into each pupil.
8. Attach lower lip onto frog’s face, and attach tongue to the top of lower lip.
9. Wrap neck band around frog’s neck and stitch into place.
10. Attach bow tie over neck band and under frog’s chin and stitch into place.
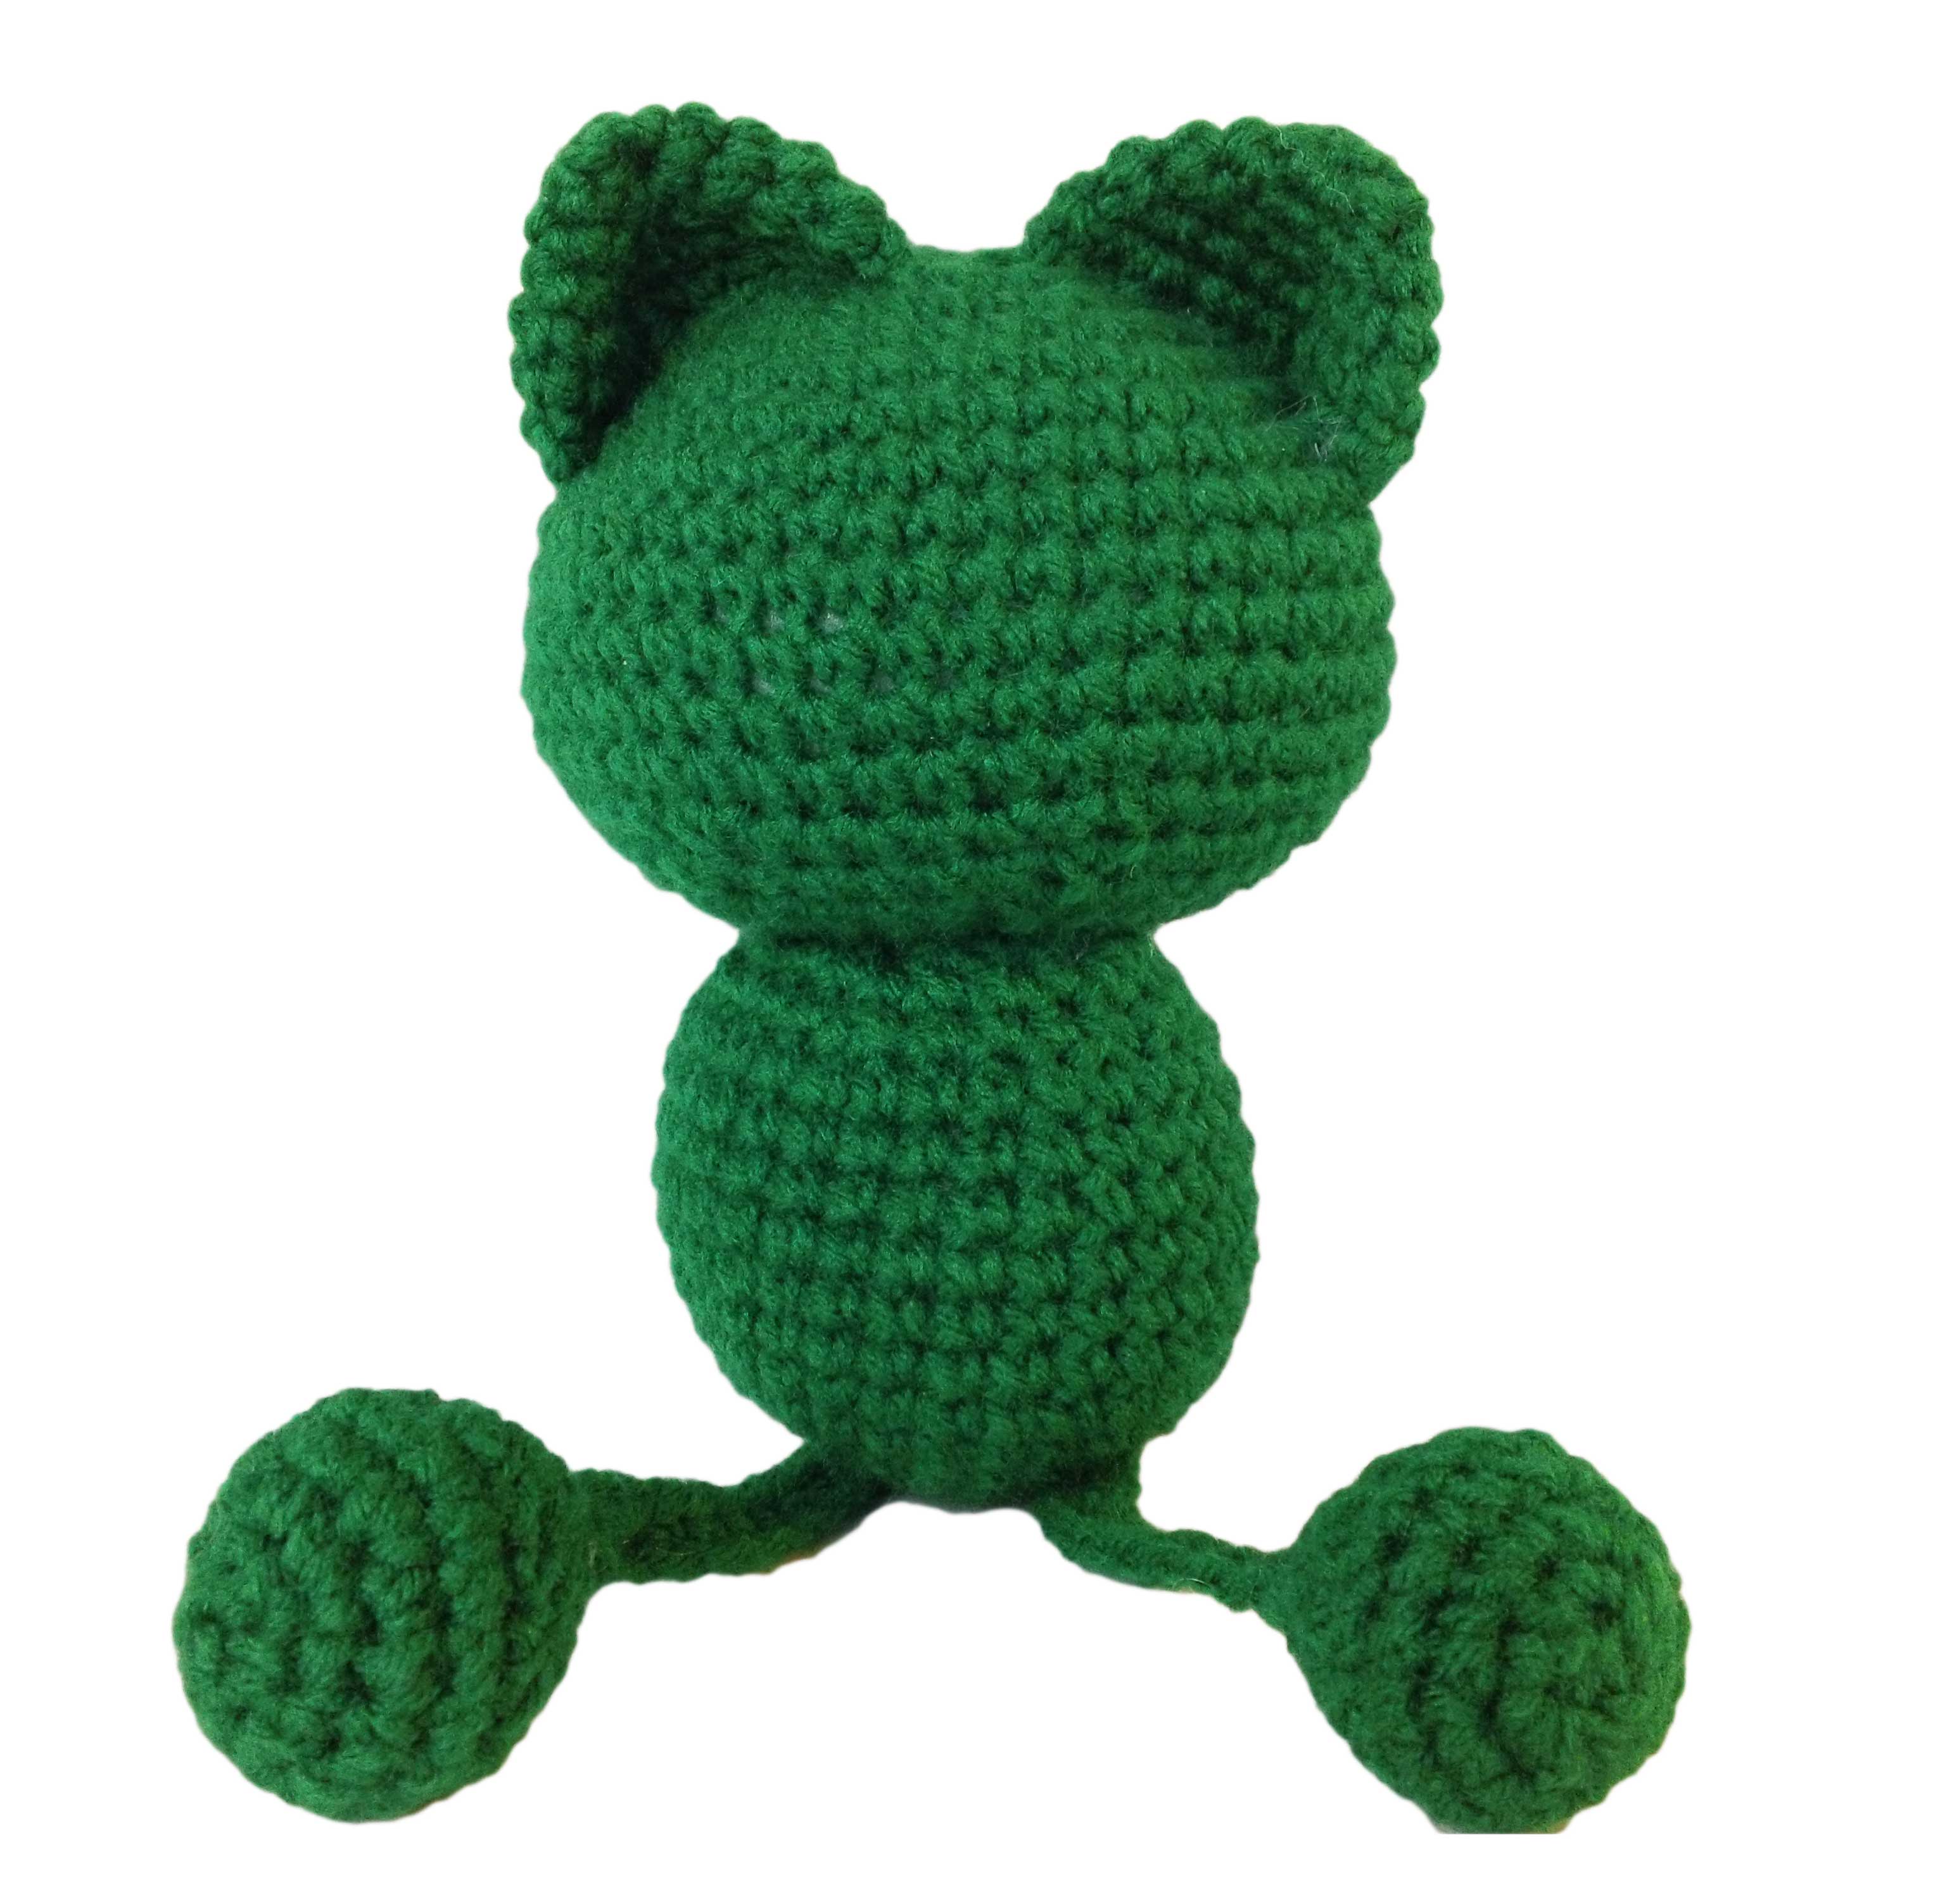
Picture: This is a picture of the back of the crochet frog pattern.
Posts in this website contain affiliate links. If you purchase a product through an affiliate link, your cost will be the same but Crochet Guru will automatically receive a small commission.
- Your support is greatly appreciated and it helps keep Crochet Guru going!
Copyright: Please feel free to sell this finished item, just make sure to give crochetguru.com credit for the pattern.
Never sell, copy, publish or claim this pattern or any other pattern you find on this website as your own.
I hope you enjoy this free crochet frog pattern, and if you have any questions or comments go ahead and voice your opinion in the comment box below.

“Hi! I'm Bobbie, the voice behind the Crochet Guru website and YouTube channel. I remember what it's like to be brand new to crochet and have no idea where to start. That's why I make every effort to create crochet books, videos, and online lessons that provide simple instructions and clear visuals! My primary goal is to direct all of my lessons toward you - the aspiring crocheter!”


