How to Make a Slip Knot for Crochet
How to Make a Slip Knot for Crochet: How to Crochet Lesson #4
Learn how to make a slip knot for crochet.
A slip knot is a handy knot that can be easily undone by pulling its tail end. This knot finds its applications in various activities such as rock climbing and boating. Moreover, in the crochet world, a slip knot proves invaluable in attaching the yarn to the crochet hook.
Note: Many crocheters will tell you that a slip knot is the only way to attach the yarn to a hook and begin a crochet project, but this is not the case. There are a variety of ways to attach yarn to a crochet hook and start a project, but a slip knot is the most fundamental way to attach yarn and begin a project. Once you master the slip knot, you will be ready to make your first set of stitches.
Before Making a Slip Knot
The first thing you need to know when making a slip knot is to always pull out 8-10 inches from your skein or ball of yarn. This crucial step ensures that you have enough yarn to begin your project without running out halfway through.
To get all of my lessons on how to crochet, make sure to purchase a copy of my "Learn to Crochet With Me the Crochet Guru" Book!
After you buy the book, follow along with me as I guide you through the exciting journey of learning crochet! Click Here to Purchase My Book
Making a Slip Knot
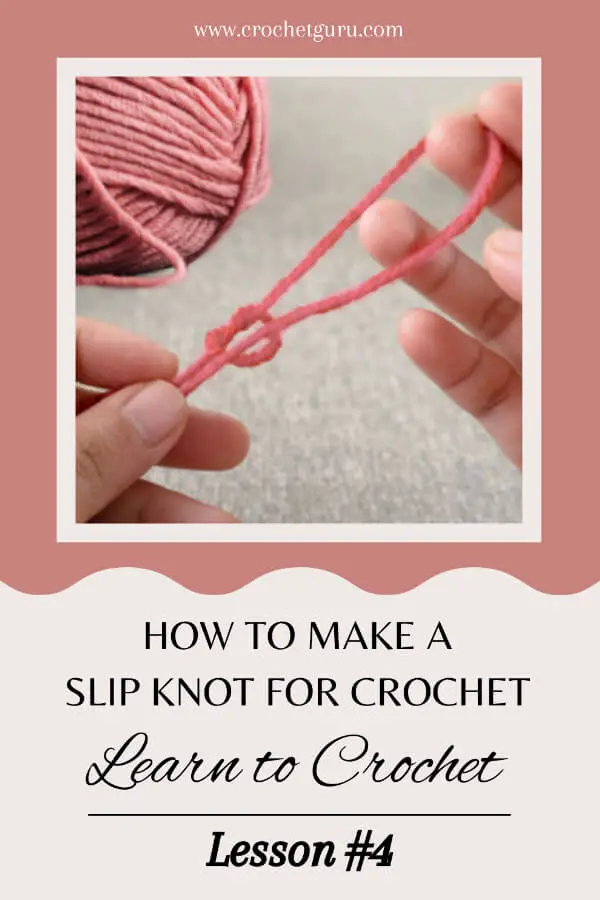
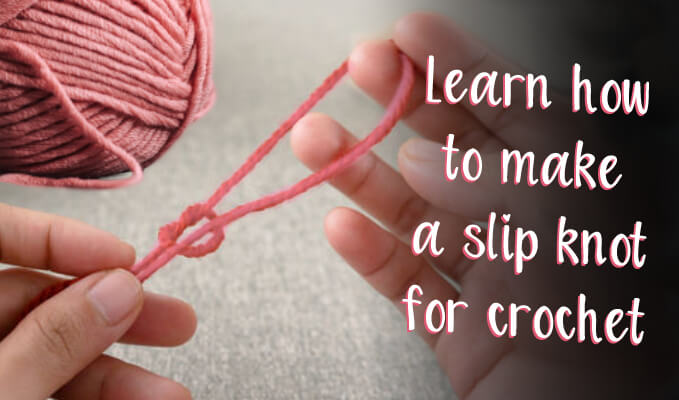
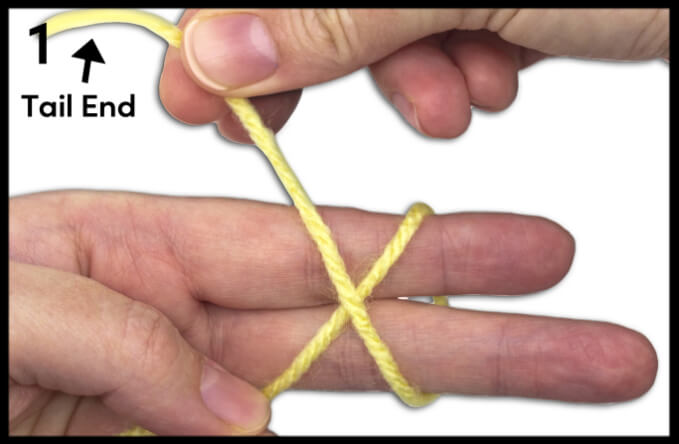
Step #1: Take the "tail end" of the yarn and wrap it around your forefinger and middle finger. Form an X shape on the inside of your fingers.
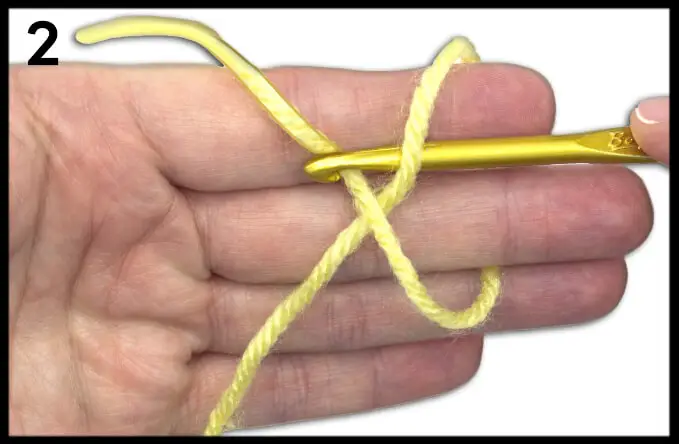
Step #2: Insert your hook under the first loop and over the "tail end" of the yarn. Catch the "tail end" of yarn with the throat of the hook.
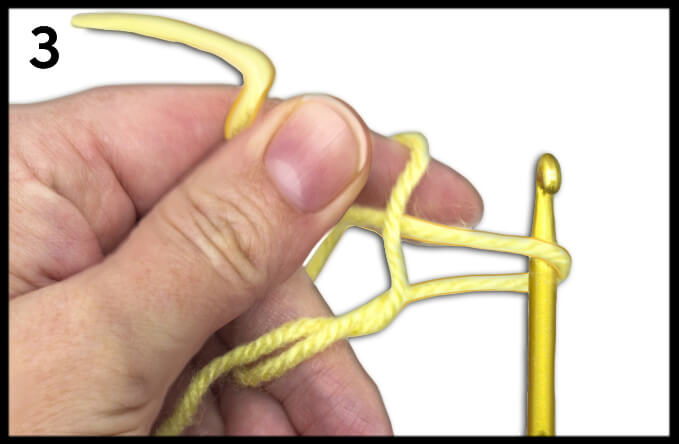
Step #3: Pull the "tail end" through the loop. Be sure to hold onto the bottom of the "tail end" with your thumb.
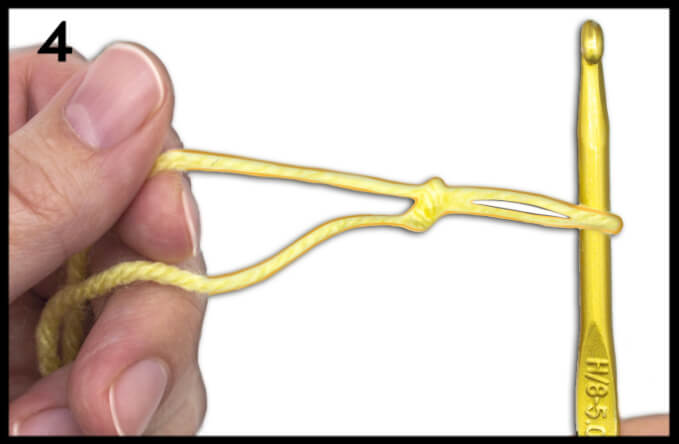
Step #4: Tighten the slip knot by pulling on both the yarn's "tail end" and the yarn's "working end."
There are More Ways to Make a Slip Knot
Making a slip knot might seem like a tedious task, but did you know there are actually multiple ways to approach it? Each crocheter has their own preferred technique, and you can discover yours with the many learning resources available.
If visual demonstrations are more your style, check out YouTube tutorials or crochet books. For even more information, websites like Easy Crochet or Crochet Spot can offer valuable insights.
In my book "Learn to Crochet With Me the Crochet Guru" I show 2 more methods of making a slip knot for crochet.
- The first method I recommend in my book is called the "pretzel method". This is a simple and easy way to create a slip knot by making a pretzel shape with your yarn and then pulling the tail end half way through the loop. This method is great for beginners who are just starting out and want to learn the basics of crocheting.
- The second method I recommend is the "forefinger-method". This method involves wrapping the yarn around your forefinger to create a slip knot with your yarn and then pulling the knot off your finger. This method is great for those who are more experienced in crocheting and want to try something new.
The Slip Knot Tension
When it comes to creating a slip knot, it's crucial to keep yarn tension in mind. If the yarn is too loose, the knot won't hold and could come undone. On the other hand, if it's too tight, the knot could be a struggle to work with. The key is to practice with different yarns and hooks until you find the perfect tension balance.
Like any skill, making a slip knot takes practice. Don’t be discouraged if your first few attempts don’t turn out perfectly. Keep practicing and you’ll soon be able to create slip knots with ease.
How to Place the Slip Knot Onto the Crochet Hook:

After you create a slip knot -
1. Place the slip knot loop onto the shaft of the crochet hook (chapter 2 - crochet hook’s anatomy).
2. Pull the tail end of the slip knot lightly to tighten the knot’s loop. This will ensure that the slip knot is secure and does not slide off the crochet hook.
3. Make sure the slip knot glides effortlessly up and down the crochet hook's throat and shaft before you begin your first stitch.
4. The main goal for the slip knot is to make sure it is not too tight or too loose before you start to crochet.
Troubleshooting Common Mistakes
If you feel that making a slip knot is not working out for you as planned. Some common mistakes include making the loop too small or too big, pulling the yarn too tight, or not pulling the yarn tight enough.
If you make a mistake, don't worry. Simply undo the knot and start again. Remember to keep the loop open enough to allow your hook to fit through it easily and adjust the tension as needed.
Making the Slip Knot Too Small
Making the slip knot too small is a common mistake that can lead to a tight and unworkable slip knot. When making a slip knot, leave enough space between your fingers to create a large enough loop to insert onto your hook. A good rule of thumb is to make the loop around the size of your hook. If the loop is too small, try making the slip knot over your crochet hook instead of your fingers.
Making the Slip Knot Too Big
On the other hand, making the slip knot too big can result in a loose and unstable slip knot, and this can cause the yarn to slip out of the knot.
The key to avoiding this mistake is creating a loop that is big enough to insert your hook. If you struggle to keep the loop tight, try holding the tail of the yarn with your non-dominant hand and pulling it gently as you tighten the knot.
To Do List: How to Make a Slip Knot for Crochet
1. Practice making a slip knot by following my example or by following a method of your choice.
2. Practice placing the slip knot onto the throat of the hook.
Great Job! You Finished Lesson #4 - How to Make a Slip Knot
Click Here to Go to Lesson #5 - How to Yarn Over the Hook for Crochet
Pin This Post!
Save this Learn How to Make a Slip Knot for Crochet - Crochet Lesson #4 to your Pinterest boards so that you can come back to it later.
Learn how to make a slip knot for crochet with my easy-to-follow tutorial! Whether you're a beginner or a seasoned crocheter, my step-by-step guide will help you create the perfect slip knot every time. Impress your friends and family with your newfound crochet skills and create beautiful handmade pieces. #CrochetSlipKnotTutorial #learncrochet #crochetforbeginners #crochetslipknot
Have Questions? Join My Crochet Guru Facebook Group!
I hope this article was helpful! If you have any additional questions, feel free to join my Crochet Guru Facebook Group. This group is for you to share pictures, ask questions, and help each other out!

